Mission “Gigabit LAN” accomplished

I recently posted about starting to upgrade my LAN from a wireless G based network to a wired gigabit setup. I got as far as running some cat5e cable between the main points in my network and I was then just waiting to replace the 100Mbit components, namely a couple of Linksys WRT54G wireless routers, with gigabit capable alternatives. Well, I’ve now completed that upgrade.

To replace my main gateway WRT54GS, I bought a Cisco Linksys E3000 dual-band wireless router. This acts as a 4 port gigabit router in addition to a wireless access point and has dual radios so can provide both N and G wireless networks simultaneously. The E3000 is also supported by the excellent DD-WRT custom firmware so I will probably switch to using that at some point, instead of the comparatively limited Linksys firmware.

For the other end of the upstairs/downstairs link I bought a second hand Cisco Linksys SLM2008 8 port gigabit smart switch on eBay for a good price. This is a nice little switch, very sturdy in construction due to its metal case and seems to offer a good range of features.

I haven’t done any formal tests yet but initial impressions are that speeds are much improved, although not the anticipated 10x increase over the 100Mbit upgrade (but, thinking about it now, that was probably naively over optimistic!)

ATI graphics cards and I just don’t get on

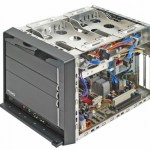
Our family PC is currently a Shuttle SN27P2 with an AMD Athlon 64 X2 dual core 6000+ CPU and 2GB of Corsair RAM running Windows Vista Ultimate 32bit edition. I’ve had this since late 2007 when I bought it to replace our previous family PC – an attractive but underpowered Mini-ITX system in a light blue aluminium Hoojum Cubit 3 case. The Shuttle is probably the most well known brand in the small form factor (SFF) market and their products are well designed and engineered.
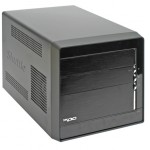
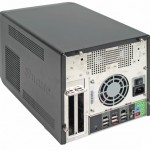
Originally this had an MSI NVIDIA fanless 8500GT 256MB graphics card in it to keep noise levels down. While not the most powerful card by any stretch of the imagination it performed adequately for what we used the PC for. Notably, the PC was configured to sleep after a period of inactivity which was crucial given the way this PC is used (i.e. jump on it, check emails, browse the web, walk away from it)

Everything was fine for a couple of years until one day the PC started experiencing video problems after being powered on for only a few minutes. This smacked of being cooling related and indeed on closer inspection I found that the passive heatsink on the GPU was loose. I tried replacing the heatsink but to no avail – the GPU must have cooked itself, so time for a new graphics card…

I wanted another fanless card and the most suitable available at the time (space is extremely limited in the Shuttle’s small form factor case so the choice of cards is restricted) seemed to be an ATI based Sapphire Radeon HD 5450 1GB. Now I’d only ever had one ATI based graphics card in the past, in a different PC, and I’d had nothing but trouble with it so I naturally gravitated to NVIDIA based cards from that point onwards – and they’d served me admirably. But, I thought that I might just have been unlucky in the past so I’d give an ATI based card another shot.

The card arrived and I installed it and the associated Catalyst drivers with no problems and all looked good. The 3DMark benchmark figures were quite a bit better than the previous card’s figures and the system appeared stable. However, the first time I tried to put the PC to sleep, it simply refused to go into standby. I double checked the BIOS settings and checked I definitely had the latest drivers installed, but all to no avail – the PC simply would not sleep. Remember, this was on a PC which previously went to sleep with no problems, the only difference being that a new graphics card and drivers had been installed. Over the next few months I spent ages Googling for solutions and I also contacted both ATI and Shuttle technical support who could offer no working solution. In the end I had to reconfigure the PC to hibernate rather than sleep after a period of inactivity or when the power button was pressed. Rightly or wrongly I place the blame for this squarely with the ATI graphics card and drivers.

So to bring this story up to date… almost a year on from installing the Radeon HD 5450 graphics card I’ve finally had enough and decided to try replacing the graphics card for another NVIDIA based one. I checked out the latest cards available at Quiet PC and found a Zotac fanless GeForce GT430 1GB within budget although it was going to be borderline whether it would fit in the limited space available in the Shuttle case. This card is a double width PCI-E card with a huge passive heatsink which wraps around the top and side.
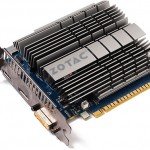
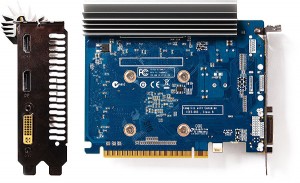
I ordered one anyway and luckily it just fits! After uninstalling all the ATI drivers and installing the NVIDIA equivalents I powered it up, checked it was stable and then tried to put it to sleep… and it worked first time! I tried it a few more times and it just worked perfectly. Thank you NVIDIA.

I don’t know if it’s just me that ATI based graphics cards don’t like, but I’ve had nothing but bad experiences with them. So, from now on I’m going to continue to be an NVIDIA man.

TVersity vs PS3 Media Server – and the winner is…?

Ever since I first started streaming media to my PS3 a couple of years ago, I’ve used what many people regard as being the best media server software, namely TVersity. When it worked, it worked OK although I’ve only ever used the basic streaming features for photos, music and video. However, more often than not my PS3 would not be able to detect TVersity unless I bounced the server while the PS3 was on. This was a bit of a pain and not quite the trouble free operation I was looking for. I did loads of searching for reports of this problem and tried numerous solutions but I never cracked it. I also experienced numerous silent crashes of the TVersity server so I wondered what else was out there to try as an alternative.

And that’s when I found the PS3 Media Server project.

I read lots of good reports about it so decided to give it a try… and it works like a charm! As soon as I installed it and ran it up, the PS3 detected it and I was able to stream content with no problems. I tried lots of tests restarting the PS3 and the server and it quickly reconnected every time – I’ve not been able to get it to fail, unlike TVersity which would fail without even trying.

Now, I might be doing TVersity a disservice here, and I might have missed some obvious solution to the problem, but for the time being, and particularly for what I want to use it for, PS3 Media Server is my new media server software.

There’s no substitute for a bit of wire…

For the last few years my home LAN has been based on a wireless mesh created from Linksys WRT-54G wireless routers (G, GS and GL models) running custom firmware from Sveasoft and more recently DD-WRT. This has worked OK and provided the flexibility of being able to have numerous network connected devices (PCs, laptops, netbooks, games consoles, internet enabled TVs etc.) without the need for physical cabling throughout the house. However, I’ve always been somewhat underwhelmed with the speed of the network, frequently moaning about the time taken to transfer large amounts of data from one device to another. As an example, a typical transfer speed while copying files from downstairs to upstairs was about 20 Mb/s – not great.

The WRT-54G routers are only wireless G (54 Mbit theoretical maximum) so I could obviously have looked at upgrading to a newer wireless N setup but I think I still would have been disappointed with the network throughput. So I’ve finally decided to bite the bullet and install a couple of Cat5e cables between key locations in the house. My internet connection comes into my office upstairs where my main gateway router, server and main PC are; directly below my office is the lounge where we have another router together with a family PC, PS3 and Wii. These two routers were previously linked by wireless using a WDS (Wireless Distribution System) link with devices then connected to the routers either by cable or over wireless. With the installation of the Cat5e cabling these routers are now linked physically eliminating the need for the wireless link between them (which actually operated at only half speed because of the fact they were also acting as access points!)

Testing the throughput after these changes resulted in a typical transfer speed of around 90 Mb/s, over a 4x increase! Much more like it 🙂

One consequence of still using WRT-54G routers is that the LAN is restricted to 100 Mb/s, whereas most of my connected devices are actually gigabit 1000 Mb/s capable. So, I think my next upgrade will be to replace the WRT-54Gs with some gigabit routers, most likely the latest Linksys E3000 which can also run the DD-WRT firmware. More on that later!

PS3 hard drive upgrade woes

I’ve just upgraded the hard drive in my beloved PS3 for the second time in its life.

The first time I upgraded the hard drive was couple of years ago, taking the original UK launch 60GB PS3 (complete with PS2 backwards compatibility) to 250GB. That first upgrade was pretty painless, although the backup and restore did take about 6 hours in total. I wanted to keep the existing content from the original drive (saved games, game installs, downloaded games and demos etc.) so the only option was to use the built-in backup utility to transfer the contents to a USB attached FAT32 formatted external drive.

I filled the 250GB a couple of months ago so decided to upgrade it again, this time to a 500GB drive. Of course, again I wanted to keep the content from the old drive so began the backup process to a spare external drive. That’s where I hit the first problem – how to format the external drive as FAT32.

The Windows XP, Vista and Windows 7 format utilities don’t support FAT32 formatting from the GUI although I did find mention of a /fs:fat32 option on the command line version of the FORMAT command. I couldn’t get this to work despite several attempts. In the end after reading a couple of recommendations on the web I downloaded the free EASEUS Partition Master 6.5.2 Home software – and this worked great! So, I was ready to start the backup.

The next problem I hit was that the backup was taking an age – the first attempt had been running 7 hours before I stopped it and decided to delete some of the movies and ripped CDs I’d got on the PS3 in order to reduce the amount of data to be backed up. This appeared to improve matters… until the external USB hard drive started playing up on me! It was the old 320GB drive I took out of my Sky+ HD box when I upgraded that which I assumed would be fine, but I don’t have much luck with hard drives.

So next I tried a brand new 1GB Samsung drive and this worked fine… although the backup took 15 hours!!! Why on earth did it take that long? All it has to do is compress the data and write it to the drive. Anyway, hoping that the restore to the new 500GB drive once fitted would be quicker I proceeded with the upgrade. The old drive came out and the new drive went in in about 5 minutes – dead easy. I started the restore from the backup and left it running… for another 15 hours!!!

Although the upgrade was successful I can’t believe it took so long. Sony have recently added, in one of the latest firmware upgrades, a new utility for transferring data from one PS3 to another but I don’t think this is intended to be used for hard drive upgrades as you obviously need a second PS3, more for transferring the drive from a broken PS3 I think. What would be great is if Sony provided more flexible and efficient options for archiving data. For example, the backup utility could allow you to select the types of data to be backed up maybe with some indication of importance of the data e.g. saved game data and other precious data would be most important. Also, providing a flexible network based backup option without the need for a USB external drive would also be good.

Anyway, my PS3 is back up and running now with a 500GB drive in it – just in time for playing the new games I got at Christmas (Assassin’s Creed Brotherhood and Red Dead Redemption).

Beware of Maven resource filtering – AGAIN!

I recently blogged about problems I’d encountered with Maven filtering resource files that I didn’t actually want filtering resulting in corrupted resources in my target artifact. So you’d think I’d more careful from that point on, right?

Well, it’s just happened again! In the first situation I blogged about, the resource files in question were TrueType font files. In this latest occurrence I couldn’t understand why some native DLLs which I am packaging with my app appeared not to be loading correctly. After much head scratching, it finally dawned on me that they could be getting corrupted during the Maven build. When I checked the POM I found that I’d inadvertently switched on filtering for all resources by mistake with the result that the DLLs were being filtered and ending up corrupted. Once I’d corrected the filtering switch everything started working again.

So the moral is always be aware of the implications of switching Maven resource filtering on!

Passing arguments to surefire when using the Maven release plugin

I’ve recently been using the Maven release plugin more and more at work to simplify the process of releasing various Maven artifacts that we produce. I’ll not go into detail about the release plugin as you can read more about it here, but what I will say is that it does a lot of the manual grunt work for you associated with the release of an artifact e.g. checking for unresolved SNAPSHOT dependencies, updating POM versions, committing to your SCM, creating SCM tags etc. There are a few gotchas and quirks to getting it working reliably (hey, this is Maven we’re talking about!) but once it’s working it makes life a little easier.

We use Hudson extensively as our Continuous Integration server to build and test our Maven projects, and we’ve got several jobs configured to allow releases to be performed using the M2 release Hudson plugin. This was all working just fine until we attempted to release something which had unit tests requiring certain properties to be set defining the environment the tests should be executed in. Doing this from the command line involves passing a couple of properties to the surefire plugin using the argLine plugin parameter as discussed here. However, when the tests were executed as part of the release plugin lifecycle, these properties just weren’t being recognised.

Eventually after some Googling (how often is that the case!) we came across a blog post which discussed a little-documented feature of the release plugin that allows arguments to be passed to the surefire plugin using the -Darguments option. And with a bit of careful nesting of single and double quotes were finally able to get the required properties into the surefire plugin as part of the release plugin lifecycle as follows:

-Darguments=”-DargLine=’-Denv=dev -Dsite=london'”

Finding out what’s filling up my hard drive using JDiskReport

I’ve been running very low on disk space on my Windows XP Pro OS drive recently and apart from ad-hoc removal of arbitrary temporary files when a “you are running very low…” warning appeared, I haven’t previously spent much time investigating just what is filling up my disk. Until now…

After Googling I found some useful information and tips, including the fact that it’s safe to remove the various C:\WINDOWS\$NtUninstall… directories as these contain only files required in the event that the service pack, hotfix etc. needs to be uninstalled. Assuming your system is stable following the installation of an update, the corresponding uninstall files can be removed.

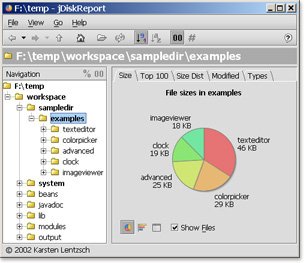
But probably the most enlightening tip was to use JDiskReport from JGoodies to visualise what is on your disk. The tool is quite simple in concept, showing a hierarchical breakdown and graphical representation of the various directories and files on your disk, but the way it allows you to sort the data and click and drill-down into lower levels makes it so much easier to see exactly who the culprits are for taking up excessive disk space.

Using this I was quickly able to reclaim about 2GB of disk space by deleting loads of temporary files, old install files, orphaned files etc. and that’s without going into too much detail. 2GB might not sound like a lot, but when I’ve been running as low as 0 bytes free at times, it makes a huge difference to my PC performance!

PHP 5.3.3 and MySQL 5.1.44 problems on Windows 7

I’ve only recently returned to PHP and MySQL development on my new(ish) Windows 7 64-bit laptop after having done mostly Java development and static HTML sites over the last few months. Having gone through the development environment setup for Apache / PHP / MySQL etc. a million times before I just went through the motions and installed the latest versions of each component – namely Apache 2.2.16, PHP 5.3.3 and MySQL 5.1.44 at the time of writing. Assuming everything would just work as expected, I dived into development, but quickly noticed things weren’t quite right…

The first problem I encountered was with the guided setup for a new Drupal 7 alpha installation. As soon as it got to the MySQL database configuration step, it seemed to fail with a blank web page. No errors or hints as to what was wrong. Then I noticed a similar problem trying to login to a new PHPMyAdmin install. I double checked all the configuration files, re-installed both PHP and MySQL, but the problem was still happening.

At this point I did some Googling and found a post stating that it was a problem with an authentication incompatibility between PHP 5.3 and MySQL 5 and recommended rolling back to PHP 5.2.14. I tried this as suggested and both Drupal and PHPMyAdmin sprung back to life. So I’m sticking with PHP 5.2.14 for the time being…

[UPDATE] I’ve since done a bit more Googling and found this post which suggests it could in fact be an IPv6 related issue. I’ll do some more investigation when I get time.