Our solar PV installation – a year on…

Following on from the previous short post about our experiences of a new Ground Source Heat Pump system a year after its installation, here’s an even shorter post about how our solar PV array has performed a year on from when it was installed.

(For earlier posts about our solar PV installation, read these…)

Our installation comprises of 20 x Linuo 195Wp monocrystalline PV panels mounted on Schüco Lite rails connecting to an SMA SunnyBoy SB4000TL-20 inverter. The installation was specified, supplied and fitted by the excellent Greenday Renewables based at Fort Dunlop, Birmingham.

The original estimate for the total annual output of our installation, based on historical local climate and meteorological data, was 3,560 kWh. Our actual output for the first year has been 3,585 kWh which I’m pleased with given how much poor weather we’ve had this year.

As we managed to secure the higher Feed in Tariff (FiT) rate of 43.4p/kWh at installation time (which increases every year as it is index linked) we have generated an income of around £1,700 for this first year, plus any additional savings from not having to import as much electricity by using our own generated electricity as much as possible. Based on these figures the system should have paid for itself within 5 years.

Being a true geek, one of the first things I did after the system was installed was to set up some automated logging and reporting of data acquired from the inverter by connecting to its bluetooth interface. This data logging solution has evolved over time but is now implemented using the open source sma-bluetooth project running on a Raspberry Pi single board computer with a USB bluetooth adapter, storing captured data in a MySQL database and producing real-time web accessible charts using PHP and the excellent Highcharts library.

I look forward to reporting on how the system has performed after it’s second anniversary!

I love my (recently repaired, not so new) LG Google Nexus 4

Nexus-4A couple of weeks ago I finally replaced my trusty but dated HTC Desire Android phone with a shiny new LG Google Nexus 4 running the latest version of Android Jelly Bean.

The Desire has served me well but it’s crippled by an appalling lack of built-in storage so I’d been waiting for the ideal replacement handset to arrive and after reading lots of reviews the Nexus 4 seemed like the one to go for, both in terms of specification and value for money.

I bought it directly from the Google Play store for £280 as soon as they came back into stock in the UK, and it arrived within a week even though the stated delivery time was 1-2 weeks. After paying £31 a month on a Vodafone pay monthly contract for the last couple of years I also switched to a 12 month SIM-only contract with Orange after getting fed up of having declining network coverage at home with Vodafone, reducing my monthly bill to £10.50 at the same time – bargain!

After using the Desire for so long, the Nexus 4 was like a breath of fresh air. Very, very responsive running the latest Android Jelly Bean, an amazing quality screen, plenty of storage for installing as many apps as I want and a high quality construction. However, during the first few days of owning it I did notice that it was a slippery beast, frequently sliding itself off flat surfaces due to the highly polished glass back. Although I’m not a big fan of cases on mobile phones as I feel they detract from the natural look and feel of them, I resigned myself to the fact that would probably have to get one for the Nexus 4…

Disaster strikes!

…But I left it too late, and after only 2 weeks of owning it, it slipped out of my hand when getting it out of my jacket pocket and fell onto a concrete floor smashing the bottom left corner of the screen and damaging the digitizer such that the bottom row of controls (yes the main Navigation Bar!) didn’t work any more when in portrait orientation. I was gutted.

Carphone Warehouse Geek Squad to the rescue

After looking into what insurance cover I had for the phone, including any excesses and knock-on premium hikes I would incur if I claimed, I decided to get a quote for repair from Carphone Warehouse. To my surprise they quoted only £79 to replace the screen, digitizer and bezel which sounded like a good deal to me (I’d seen prices online for just the parts alone of around £85!) so I had no hesitation in leaving it with them to repair for me. I’m not sure whether this price was an error on their system but they agreed to honour it as it had been quoted to me.

Just under a week later I got a call to say that it was back at my local Carphone Warehouse store ready for collection. The repair appears to be a top quality job and the phone looks and feels as good as new, so top marks to Carphone Warehouse Geek Squad repairs!

Looking for a case

So my next task is to hunt down a good quality but unobtrusive case. I’ve read favourable reviews of the FlexShield Skin case but I can’t find them in stock anywhere. I’ll keep looking, but in the meantime I’m going to treat my Nexus 4 with kid gloves to make sure it doesn’t come a cropper again!

The ground source heat pump – a year on…

It’s just over a year now since our IVT Greenline HT+ E11 11kW ground source heat pump (GSHP) was installed so I thought it would be the perfect time to reflect on our experiences of owning and running a system like this, and also importantly to do some quick analysis on how much electricity we’ve used over that period compared with previous years.

If you’re interested in previous posts relating to the heat pump, take a look at these…

A bit of background…

First, though, it’s worth a re-cap on why we decided to install a ground source heat pump  in the first place. During the latter part of 2011 we extended our house considerably by converting an adjoining timber-framed thatched barn into additional living space and creating an enlarged entrance hall, a new open plan living and dining space, large kitchen and utility room. Our existing central heating and hot water system was an electrically heated wet system with radiators designed to work with low-rate electricity tariffs. Although electrically powered (which sounds frighteningly expensive!), this had worked reasonably well and efficiently over the previous 12 years since installation but it was nearing end-of-life, the manufacturer had gone out of business and it was simply not big enough to satisfy the increased demands of the enlarged property. So it had to be replaced with a new system.

After looking at all the options available to us, particularly as we are off the gas grid, and comparing various traditional technologies with newer ones, a ground source heat pump emerged as the ideal choice for us.

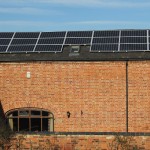
At the time we decided on a GSHP we also planned to add a solar thermal installation to supplement the hot water. As it eventually turned out, we didn’t install solar thermal and instead opted for a 4kW (peak) solar PV array which, we were told, would be a very good companion to the heat pump.

Installation and commissioning

Our GSHP system was supplied by ICE Energy, probably the UK’s biggest and most experienced supplier of GSHPs. It was important to me that we chose a company with a lot of experience given the general lack of knowledge and even awareness of this technology, and we definitely got that with ICE Energy. Their sales, engineering and technical support staff were very knowledgeable, efficient and professional at all times so I would highly recommend them to anyone else looking for a heat pump.

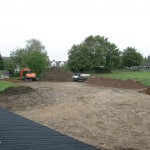
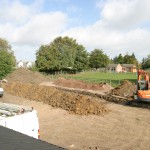
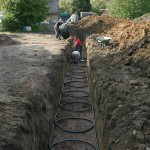
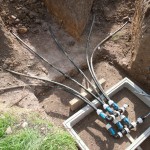
The installation of the heat pump, cylinder and associated plumbing was pretty straightforward for the plumber working on our barn conversion, even though he had never installed one of these before. The work associated with the installation of the ground collector pipework loops was a lot more than I had originally imagined, with some 300 tonnes of soil being moved during the course of the work: digging the three trenches, 50m long x 1m wide x 1m deep, laying 200m of coiled collector pipe “slinkies” in each trench, creating a concrete inspection chamber to house the pipework manifolds, filling the trenches back in and making good the paddock again. Having said that, it was all completed within about 4 days and even though my paddock looked like a barren wasteland for a few weeks, it didn’t take long for the re-seeded grass to grow back and look as good as it had previously.

The commissioning of the system, which included checking the basic installation, filling the collector ground loop with the heat transfer fluid and powering on the system for the first time was carried out by an ICE Energy engineer. He also talked through the basic operation of the system, how to tweak the controls and what maintenance tasks needed to be performed. There was a lot of information to take in but I also had the full manual which I read several times to make sure I absorbed the important detail.

The early days

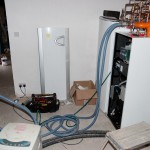
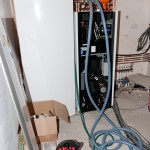
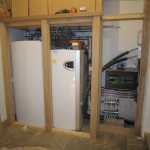
Initial impressions of the system were very favourable. It was very quiet in operation, which was an important factor given that it is housed in specially made oak framed cupboards in our entrance hall, immediately adjacent to our main living area.

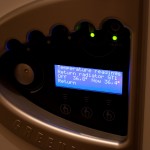
The first few months involved a lot of tweaking of the system settings in order to find an acceptable level of comfort while still trying to keep it running as economically as possible. The primary settings of the heat pump include a heat “curve” which dictates how much heat the heat pump should generate given the current outdoor temperature and the temperature of the water returning from the underfloor/radiators. The steeper the curve, the more heat it will generate at lower temperatures. There is also a “fine tune” setting which raises or lowers the heat curve (not adjusting the slope of the curve) to increase or decrease the target temperature. One other setting I tweaked was that of the domestic hot water temperature, which was initially set to 49°C. I lowered this to 47°C which was still perfectly acceptable for hot water but would squeeze a little bit more efficiency out of the system by not being required to maintain quite as high a temperature.

The installation has been problem free apart from one occasion during the first couple of weeks after installation where our new underfloor heating wasn’t reaching the desired temperature, and this turned out to be because the pressure in the unvented system had dropped. Once this was corrected we had no further problems like that.

It’s fair to say that the house, particularly in the old part with traditional radiators, was cooler than it had been previously during this initial running-in period but we eventually found the settings that worked for us under all conditions and we’ve not changed them since. In fact, that is one of the selling points of a system like this – once it is set up, you shouldn’t ever need to touch it again!

Maintenance

There is virtually no maintenance to be carried out on the GSHP and I believe this is true for the whole life of the system. You do have to check a couple of particle strainer filters a couple of times a year, one external to the heat pump unit on the ground loop circuit, and one internal to the unit. This is a straightforward task and should only take around 30 mins at most to complete.

Electricity consumption

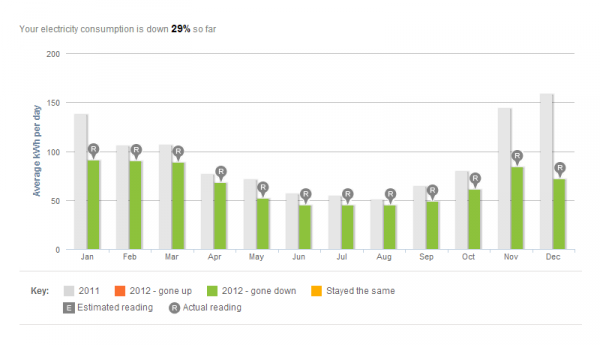
So, we finally get onto our electricity consumption over the last year. Bearing in mind the house is now almost twice as big as it was previously with a larger space to heat and more appliances and lighting, I’m very happy to report that our electricity consumption has actually gone down over the last year by around 30%! I’ve got to say I am very pleasantly surprised by this and I had feared quite a few times that we would be using more electricity.

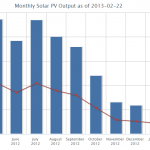
Our solar PV system will have had some impact on these figures due to the fact we will have used our own generated electricity some of the time rather than having to import it. But this is probably not a significant factor as the times when we were generating the most electricity were a few hours during sunny Spring and Summer days when the heat pump wasn’t on much. Looking at seasonable usage, I suspect the savings are largely down to the efficiency of the GSHP when compared with our previous system. I haven’t had chance to calculate the coefficient of performance (CoP) for our system yet but this is something I would like to do in the future.

Don’t get me wrong – we still use a lot of electricity, much more than a lot of households use I would imagine – but the important and re-assuring thing is that we are now using considerably less than we did before. And given that our only fuel is electricity, this bodes well for the future.

electricity-consumptionSavings and subsidies

Finally, I just wanted to say a little about the financial aspects of this system. In total, it probably cost us around £15K for the installation of the GSHP, which is quite a sizable up front investment, however this was offset slightly by a £1,250 installation grant under the Renewable Heat Premium Payment (RHPP) scheme operated by the UK Government. In addition to this, if all goes to plan, the new Renewable Heat Incentive (RHI) scheme should start in Summer 2013 which will provide an annual payment towards the cost of the installation, similar to the Feed-in-Tariff (FiT) scheme for Solar PV installations, over a proposed 7 year period (compared with the 20+ years for solar). This would more than cover the cost of installation of the GSHP system, and when combined with the solar FiT payments we are already receiving, will cover the cost of all of our energy usage over the next few years.

vSphere 5.1 client not compatible with ESXi 5.0?

I recently upgraded one of my ESXi hosts from version 5.0 to 5.1. The upgrade of ESXi itself went fine (simply boot from the ESXi 5.1 install CD and select the existing ESXi 5.0 installation as the target and it gives you the option to perform an upgrade rather than a fresh install), but trying to access this subsequently with my existing vSphere 5.0 client install resulted in a message informing me certain components had to be downloaded. When I looked at what it was wanting to download it turned out to be the vSphere 5.1 client installer which I could sort of understand, so I proceeded with the upgrade of the vSphere client. Once the vSphere 5.1 client had installed I was then able to access the ESXi 5.1 host.

However, when I then tried to access one of my other ESXi 5.0 hosts the vSphere 5.1 client gave me the same message as previously and asking if I wanted to download new components. Looking at what it was downloading this time it turned out to be the vSphere 5.0 client installer! This suggests – and I couldn’t find it documented anywhere online – that the vSphere 5.1 client is not backwardly compatible with earlier ESXi hosts, which seems a bit dumb to me.

So, if you are upgrading an ESXi host from 5.0 to 5.1 and want to be able to able to manage all your ESXi hosts with the same vSphere 5.1 client, you will need to upgrade them all to ESXi 5.1.

RAID on my HP ML115 G5 ESXi server

Continuing with my exploits at rebuilding my HP ML115 G5 based home server running ESXi 5 I’ve now turned my attention to data resilience by looking at a hardware RAID solution.

After a bit of research I decided on using an HP Smart Array P400 Controller as it seems to be a good balance between performance and cost, particularly when coupled with the optional 512MB battery backed accelerator cache. Another reason for choosing the P400 controller is that it appears on the VMWare ESXi Hardware Compatibilty List.

There are lots on eBay for a reasonable price, many of which appear to be pulled from decommissioned enterprise rack servers. I got mine for £60 including the 512MB cache and battery.

The P400 features 8 channels split across two SFF8484 connectors. Typically these are connected to hot swap SAS drive cages but they can also be connected directly to attached SATA drives using an SFF8484 to SATA breakout cable, such as this one sold by Startech.

I’ve never used a hardware RAID solution before so it’s a new learning experience for me. The process involves using the HP Array Configuration Utility (ACU) – which can be booted from CD/DVD or USB flash drive – to create a new array containing the desired physical drives, and then on this array creating a logical drive in the required RAID scheme. For my initial tests I’m going to use a couple of HP 160GB SATA drives configured as a simple RAID 1 mirror which will hopefully give me the data resilience I need. With more drives available other options such as RAID 1+0 or RAID 5 are possible.

I want to do some testing with this configuration, including ensuring it works fine with ESXi and also by removing one of the drives to simulate a failure so I can understand how it handles an array in a degraded state and how it recovers. Assuming everything goes well and I am happy with it all I will then look at converting my current live ESXi installation over to RAID 1 scheme using the existing 250GB HP SATA drives I have. Fingers crossed it all goes OK!

The dead HP ML115 – the plot thickens…

So, I’ve now replaced my dead HP ML115 G5 server with one bought on eBay and built a second one from a combination of parts from my original broken one and another bought for a bargain price on eBay.

Once the second ML115 G5 was built, I just thought I’d try the old “broken” motherboard in this new chassis… and lo and behold, it works!

When I previously investigated the problems with my original server, there was no sign of life when powered up. No motherboard LEDs lit, no fans and no response to the on/off switch. So I tested the HP power supply out of the chassis with a couple of hard drives connected and shorting the connectors for the on/off switch. The PSU fan and hard drives span up suggesting the PSU was OK. I then tried an old, spare non-HP ATX PSU I had lying around and this didn’t seem to work either. So my conclusion was that either the motherboard or the chassis wiring was at fault – with the motherboard being my strong suspicion.

Well now I know that the motherboard is OK. The original motherboard works fine in the original chassis with one of the “new” PSUs. I’ve also just tried again with the spare non-HP ATX PSU and it works! So my investigation and testing of the PSU was woefully inadequate.

I suspect that genuine replacement HP PSUs are going to be prohibitively expensive so I’ll either look for a used one on eBay or look at using a non-HP ATX power supply instead (the only downside of the latter being that the HP PSU is a non-standard size – it’s smaller – and so fitting a standard ATX PSU in the chassis needs some minor modifications for additional mounting holes and also leaves a gap between the PSU and the top of the case).

I’m going to have enough HP ML115 G5 servers before I’m done to start my own mini datacentre!

Unable to SSH from one ESXi host to another – solved

While setting up ESXi 5 on my new HP ML115 G5 server I needed to migrate some guest VMs from another ESXi host I have. I found a couple of online blog posts about how to enable the ESXi shell and SSH services for the two hosts, but I was still unable to ssh from one host to another, repeatedly getting connection timeouts.

I could reliably SSH to both ESXi hosts from other places, just not from the hosts themselves. I also could not SSH to other hosts from either of the ESXi hosts – so this strongly suggested a firewall type issue.

It wasn’t until I checked the Firewall settings in the vSphere client under Configuration -> Security Profile that I realised that SSH Server and SSH Client have separate firewall controls for inbound and outbound SSH connections. The SSH Server option (i.e. for inbound connections) was enabled but not the SSH Client option. As soon as I enabled the client option I was then able to establish SSH client connections from my ESXi hosts.

Replacing my dead HP ML115 G5

Following on from a previous post relating to the death of my HP ML115 G5 server, I’ve been busy on eBay over the last few days looking for a replacement. As a result, I’ve managed to secure not one but two used ML115 G5s.

The first is exactly the same model as my original with the quad core Opteron 1352 CPU albeit having been upgraded to 8GB RAM and with a new 250GB hard drive to replace the original 160GB drive. It’s in very good condition and looks like it’s been well looked after. I managed to get this for £120 as a Best Offer which seems to be a typical sort of price for a good condition ML115 G5. It’s a little more than I wanted to pay but I don’t mind too much given that it has 8GB RAM which would probably cost £30-£40 anyway.

The second was a last minute purchase which was too good an opportunity to miss. It’s a dual core Opteron 1214 model with 1GB RAM and separate video and sound cards and a Hansol LCD monitor which has actually been used as a cheap desktop machine, but I managed to get this all for the princely sum of only £31. What a bargain! The auction for this started with an initial bid of £30 or a Buy It Now of £50. After a couple of email exchanges with the seller to confirm details of the item I was just about to go for the Buy It Now option when someone actually placed a £30 bid and the Buy It Now option disappeared! Bad eBay timing again! However, as it turned out I managed to win the auction in the end with a bid of only £31, so I actually saved myself £19 on what I was prepared to pay. I will most likely replace the dual core CPU in this model with the quad core from my original and may get an extra 4GB RAM to add to my original 4GB so that I end up with two equivalent 8GB models.

So all in all I’m pretty pleased with how things have turned out.

Next step is to get one of the ML115s configured as my main server again. More on this later…

My HP ML115 G5 home server is dead

After several years of trusty service, my HP ML115 G5 quad core AMD Opteron server is dead. This was my main internet facing home server hosting mail accounts for family and friends, a couple of personal web sites, DHCP, local MySQL database, a ZoneMinder installation supporting my IP based security cameras and other assorted services so it’s loss is a bit of a problem to say the least!

The server ran a bare-metal install of Debian 6 and had performed admirably since it was first purchased to replace my previous lower spec home server. At the time I only paid about £200 for it as it was purchased using one of the numerous offers HP runs from time to time. This was great value for a quad core AMD 2.2 GHz Opteron 1352 with 1GB RAM, a 160GB hard drive and a DVD-ROM drive in a decent quality tower case. I transferred the old hard drive over from my previous server and upgraded the memory to 4GB and combined with an APC UPS this is the state it has been running in for the last few years. Until now.

There is absolutely no sign of life from the motherboard – no LEDs on the motherboard are lit despite trying alternative PSUs – so I suspect the board is dead.

I’ve been very pleased with this server so I would like to replace it with an equivalent if possible. I’ve looked up the price online for a new replacement motherboard sourced from HP and it is in the range £300 – £400 so there’s no way I will be going that route. I did manage to find a new one on eBay from a seller in China for around £80 including shipping but this was sold just as I was about to order it! So my next step is to try and find a complete used ML115 G5 on eBay either to use as a donor for just the motherboard to fix mine, or to act as a complete replacement.

In the short term however my immediate priority is to restore the services I’m missing, most importantly email. I do have an HP N36L Microserver with 8GB RAM acting as a home lab ESXi host so I think I will build a temporary VM on there as a stop gap until I get a more permanent replacement in place. Watch this space…

More solar PV goodness

A couple of days after posting about the latest record day from my solar PV installation, the record was broken again! A new record of 26.69 kWh for the day.

In fact, the last 6 days have all produced over 22 kWh for the day.

And finally, another comment on the performance of my ground source heat pump. With the recent hot weather the heat pump has been on an average of only 1 hour a day – in fact yesterday it didn’t come on at all! All helping to save me money 🙂